Downloading an Ubuntu ISO
Ubuntu is distributed over the Internet as DVD image (.iso) files. The GettingUbuntu page has links to the ISO image files, as well as other methods of getting Ubuntu.
If you have downloaded an .img file, please refer to the .img writing documentation.
|
Verifying the ISO integrity
Before burning a DVD, it is highly recommended that you verify the md5 sum or sha256 sum (hash) of the .iso file. For instructions, please seeHowToMD5SUM and HowToSHA256SUM. For the current list of Official Ubuntu SHA256 hashes, see the SHA256SUMS file for the release you're using under http://releases.ubuntu.com (and optionally the PGP signatures in the SHA256SUMS.gpg file); hashes for the older MD5 algorithm are in the same directory. UbuntuHashes currently has only md5sums. Checking the hash ensures that the file was not damaged during the download process and is 100% intact.
Burning the ISO on to a DVD
You can also install Ubuntu from a USB stick.
|
Unlike a regular data file, the ISO file cannot be simply dragged and dropped or copied directly onto a disc. It needs to be burned in a specific way that expands/extracts the image so you have usable files on your disc.
To install Ubuntu from a DVD, you first need to burn the downloaded ISO image onto a DVD. This requires:
- A working DVD burner (i.e. R/W drive)
- A blank DVD. (recent Ubuntu versions do not fit on to CD any more)
Inexpensive "write once" DVD-Rs are a good choice for burning ISO images.
Burning from Windows
Windows 7/8/8.1
- Right-click on an ISO image and choose “Burn disc image”.
- Select a disk burner (drive) and press "Burn".
If you check “Verify disc after burning”, it will verify that the ISO image has been burned correctly
|
Windows 2000 or newer: Infra Recorder
- Download and install Infra Recorder, a free and open source image burning program.
- Insert a blank CD in the drive and select Do nothing or Cancel if an autorun dialog pops up.
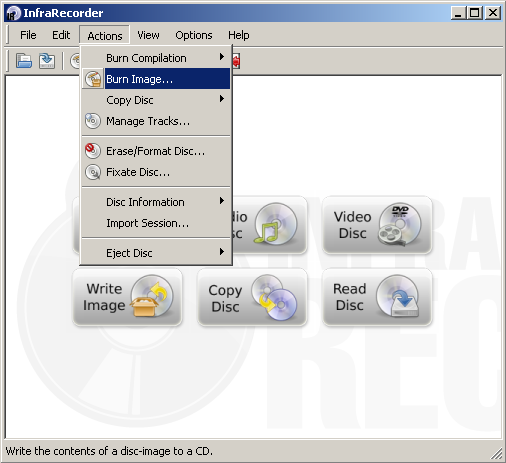
- Open Infra Recorder and click the 'Write Image' button in the main screen.
- Alternatively you can select the 'Actions' menu, then 'Burn image'.
- Alternatively you can select the 'Actions' menu, then 'Burn image'.
- Select the Ubuntu CD image file you want to use, then click 'Open'.
- In the dialog, click 'OK'.
Windows XP or newer: ISO Recorder
- Download and install the appropriate version of ISO Recorder.
- Insert an unformatted CD into your burner. (Note: one can burn DVDs with this tool only from Vista.)
- Open Windows Explorer, browse to your ISO file, right-click and choose "Next".
Burning from Mac OS X
Note: To burn most ISOs, you can use Apple's Disk Utility (Disk Copy in older versions).
- Launch Disk Utility (Applications → Utilities → Disk Utility).
- Insert your blank CD/DVD.
- Drag and drop your .iso file to the left pane in Disk Utility. Now both the blank disc and the .iso should be listed.
- Select the .iso file, and click on the Burn button in the toolbar.
- Ensure that the "Verify burned data" checkbox is ticked (you may need to click on the disclosure triangle to see the checkbox).
- Click on Burn. The data will be burned and verified.
Burning from Ubuntu
The procedure may differ slightly depending on which version of Ubuntu you are using
|
- Insert a blank CD into your burner. A "CD/DVD Creator" or "Choose Disc Type" window might pop up. Close this, as we will not be using it.
- Browse to the downloaded ISO image in the file browser.
- Right click on the ISO image file and choose "Write to Disc".
- Where it says "Select a disc to write to", select the blank CD.
- If you want, click "Properties" and select the burning speed. Lower speeds offer greater reliability, but will take longer to write.
- Start the burning process.
- The program should automatically check whether the image has been burned correctly.
- If the standard CD burning application does not work, install K3B and follow the instructions for Kubuntu below.
Burning from Kubuntu
The procedure may differ slightly depending on which version of Kubuntu you are using
|
- Insert a blank CD into your burner. Open K3B from the KDE menu
- On the near bottom of the application where it says "Welcome to K3b - The CD and DVD Kreator" click "more actions..." and then pick "Burn Image".
- You may want to enable the disk verification option to make sure the image is burned correctly, and lower the burning speed to have more reliability.
- Start the burning process.
- You can use the default settings.
See CdDvd/Burning if you would like to burn from the command line (terminal)
|
If the burning fails
If the CD writing fails, try writing at a slower speed. For better results, try the slowest burn speed reasonably possible. Most GUI tools have a "Properties" button to select speed but with Brasero those sorts of options appear after pressing the "burn" button first. This is the single most likely cause of problems but is much more widely known than MD5sum/SHA error-checking. Slower speeds ensure greater accuracy.
Checking the integrity of the finished DVD
The CDIntegrityCheck page describes how to verify the integrity of the finished disk. Please try your DVD as a LiveDVD. If your finished disk fails to boot when you restart your computer, please refer to the BootFromCD page.


No comments:
Post a Comment